Preparation
- Obtain informed consent (unless emergent; ask available provider to call family).
- Review recent anesthesia records for mask difficulty, laryngeal view, blade and ETT sizes.
- If difficult mask, view was Grade III or more difficult, or if tenuous hemodynamic status, consider anesthesia backup (59111, available 24×7) or ORL (page on-call attending). Consider difficult airway cart and LMA use as needed.
- Assess vascular access. Place IV or IO as necessary. Prepare push line.
- Draw up intubation medications.
- Assess NPO status. Aspirate and vent G-tube or NG if present.
- Identify roles, including primary and backup laryngoscopist, bedside RN (medications), charting RN, charge RN, RT.
- Prepare equipment (use bedside table)
- C-MAC and/or laryngoscope handle and blade; check light for brightness
- ETT and stylet; check cuff integrity. Size below and above available. ETT tape.
- Oral vs nasal airway
- End-tidal detector (not colorimetric adapter; check functionality)
- Yankauer and suction
- Bag and mask. Ensure FiO2 is appropriate (usually 100%, consider 21-40% for single ventricle physiology)
- If nasotracheal intubation planned, Magills forceps, lube and suction catheter available.
- Ensure monitors facing team. Pulseox tracing strong with audible alert. Arterial line zeroed or cycle BP Q1 minute.
Setting up the room

- PPE – including gown, mask, goggles, gloves
- Position baby with head accessible
- ETT of appropriate size, oral/nasal airway, ±LMA
- CMAC, or laryngoscope blade including bulb brightness
- Yankauer suction
- End-tidal CO2 monitor
- Medication push line and medications
- Mechanical ventilator
- QRS volume
Proper head positioning

Positioning of the head and neck is the most important part of mask ventilation and intubation. The oral axis (OA), pharyngeal axis (PA) and laryngeal axis (LA) must be aligned. This requires extension of the head on the neck (orange arrow) AND flexion of the neck on the chest (blue arrow). A common mistake is (over)extension of the head on the neck without flexion of the neck, which can cause misalignment of the 3 axes. Often, it is necessary to place a small towel under the occiput to flex the neck.
Time Out
Review consent, difficult airway, identify roles and equipment, review plan and contingencies
Intubation procedure
- Preoxygenate/denitrogenate for 2 minutes.
- Administer medications per CICU attending.
- Wait until paralyzed while assisting ventilation.
- Perform direct laryngoscopy, place ETT by direct vision
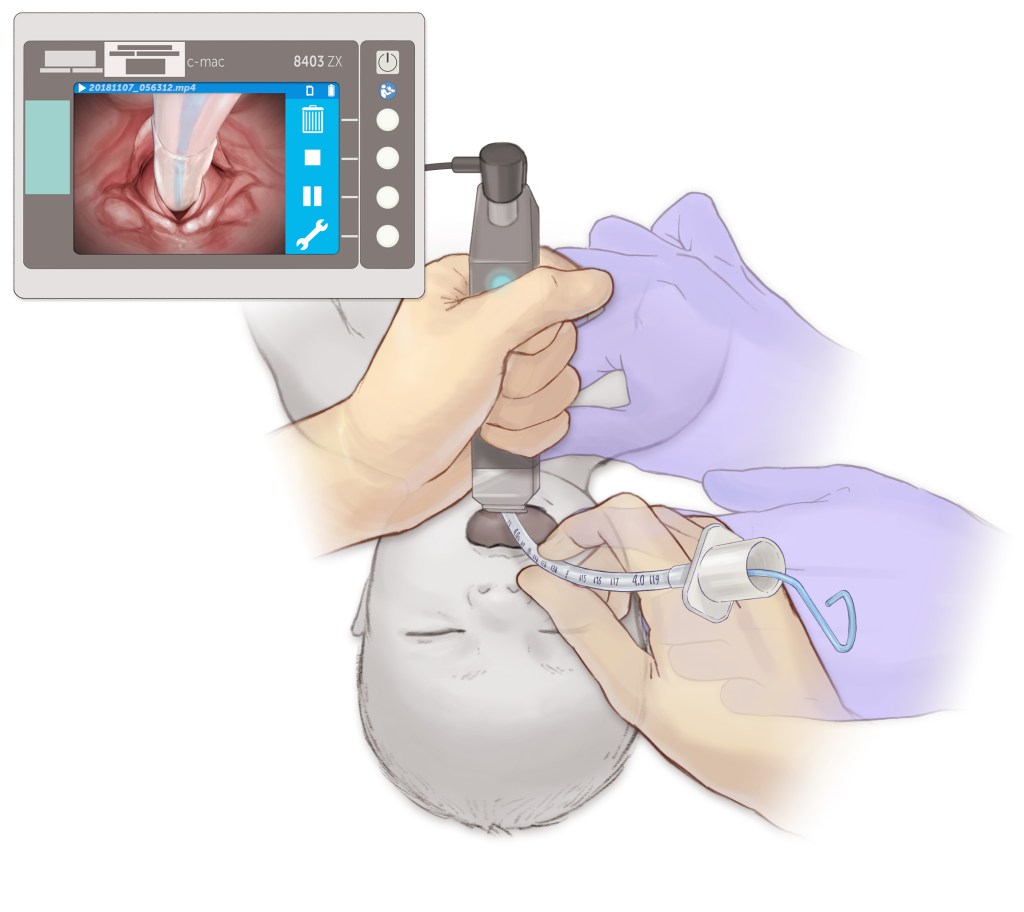
Following preparation, time out, and sedation and neuromuscular blockade (to prevent laryngospasm), the act of intubation includes two hands.
1. The left hand (regardless of handedness) holds the laryngoscope and places it into the mouth. The right hand may open the mouth to facilitate this step.
2. The left hand advances the laryngoscope blade further into the mouth towards the trachea, displacing the tongue anteriorly using motion as shown in the inset (towards the ceiling ahead of you, not torquing back on the top teeth).
3. As the blade is advanced, the epiglottis should come into view. As this occurs, continue to gently advance the blade into the vallecula (or alternatively lift the epiglottis itself). In order to safely place a tube, it is optimal to have a grade I view of the larynx (below). The application of light cricoid pressure or backward, upward, rightward pressure (BURP) may improve the view.
4. Once the view is secured, place the tube through the vocal cords under direct vision.

- Confirm position with end-tidal CO2 (should be >20 mmHg), breath sounds, saturation.
- Secure ETT with tape.
- Obtain CXR. Readjust as necessary.